How to Declutter, Clean, and Style your Kitchen for Spring
[Disclosure: Some of the links are affiliate links, meaning, at no additional cost to you, I may earn a commission if you click through and make a purchase.]
I love the Spring! The spring season represents new beginnings, longer days, and sowing seeds. The best part?! In my house, it also means Spring Cleaning!
So, while we’ll cover the full home in a spring clearing series, the first project we’re going to tackle this season is decluttering and decorating your kitchen. I’m hoping that breaking this into smaller manageable projects, will make this project feel more digestible. I don’t want anyone to lose heart, so, this in my opinion is the best way to remain focused on the larger goal without becoming totally overwhelmed! So, let’s jump in!
Project #1 - Decluttering Your Countertops

Does this sound familiar? Each time you want to prepare something to eat in your kitchen, your first step is clearing away items to make room for the process? If so, then there is too much clutter on your countertops.
Now, this is obviously too much stuff on the counter,

…but this is too.

Optimally, your counters should have a few functional and decorative items on them, but there should be more open counter space than anything else.
This is how a decluttered countertop looks. Big difference, right?!

BONUS TIP
A few quick tips to keep the kitchen counter clear and free of clutter include utilizing a tray or weaved basket to store frequently used cooking items, creating a contained coffee station for all of those pick me up goodies, and getting that knife block and other bulky items off the counter and into a cabinet! These quick changes will make all the difference in the accessible space you need to function day-to-day.
Project # 2 - Organize Your Kitchen Cabinets

Now, before we organize those kitchen cabinets, I must ask you this because it's a little pet peeve of mine. Do have handles or knobs on your cabinets? If you don’t, please add some.
Unless of course you have cabinets with built-in handles.

The handles make the cabinet doors and drawers easier to open and help them stay cleaner longer.

Not to mention, they can be a nice decorative element in your kitchen.

Next, it’s time to get rid of all of those mismatched cups and plates.

Stick to one or two colors of dishware. It decreases the physical and visual clutter.

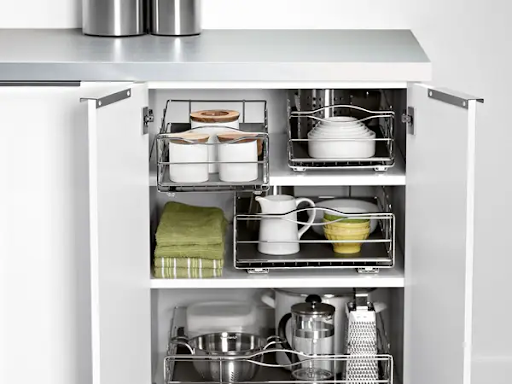
You can also add racks to the cabinets to organize your plates, cups, pots, and pans too.

Consider adding pull-out shelves to your cabinets to make it easier to access the items in the rear.
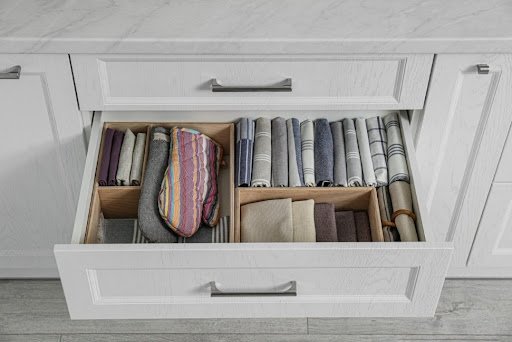
Don’t forget to create a drawer for your folded and organized kitchen towels and oven mitts.
BONUS TIP
All of the recommendations for clearing and organizing the space are bonus tips in and of themselves because it helps you maximize your available cabinet space. As a general rule, also be sure to place heavier items on the bottom of cabinet shelves, keep like items together (makes it easier to find what you need!), and implement cabinet or drawer dividers. This will help keep the space tidy! Oh! One last thing…I think it’s to have one junk drawer in the kitchen. I won’t show you that though!
Project # 3 – Organize Your Pantry

A pantry can easily become a catch-all for your food and kitchen supplies. However, this is the season to fix that.
First, take inventory of the items stored in the pantry.

Then go out and pick up some labels, clear storage containers, and baskets, so you can get to work.

Next, empty your pantry and give it a deep cleaning.

Then place the infrequently used items on the top shelf, your everyday items in the center, and your easy-to-reach kid’s snacks and slightly heavier items down below.

Now you have a clean, decluttered, and organized pantry. Nice, right!?

BONUS TIP
Don’t be tempted to skip the step of taking everything out! We know it feels like a hassle but this step can be very telling. It will help inform the types of organization solutions you actually need rather than what just looks cute. These storage solutions are an investment, so take your time and get this step done right. Your family and budget will thank you!
Project # 4 – Clean and Declutter Your Refrigerator

Does your refrigerator look like this? If it does, it’s time to declutter and get organized.
The first step is to throw away all expired foods. While we are including this as a great spring-cleaning activity.

Next, completely empty your refrigerator and then clean and disinfect it.

Now, go out and grab some organizing containers.

Lastly, group your beverages together, then your fruits and vegetables, your dairy, snacks, condiments, and leftovers.

Your refrigerator is now clean and organized and looks great! Now tell your husband and kids if they want to eat, they need to keep it this way.

BONUS TIP
This is likely one of the kitchen cleaning areas that people dislike the most. However, I recommend you increase the frequency of your regular cleaning to at least twice monthly. A quick sweep on a regular basis, including a wipe down of shelves as needed, makes maintenance feel like a breeze!
Project # 5 – Cleaning the Surfaces of your Cabinets and Appliances

Now that you’ve got everything cleaned and organized on the inside, let’s wipe down the surfaces on the outside.
For your countertops, your favorite disinfectant will do. After the last two years, I know you have a favorite.

For your cabinets, if the surface is not too dirty, a washcloth with warm water and a little Dawn dishwashing liquid will do the trick.

If your wood cabinets are sticky and greasy and can use a little more help, there are a variety of wood cleaners that will work really well to get that grime off of your cabinets.

For your stainless-steel appliances, continue to clean and disinfect your surfaces as you normally would.

BONUS TIP
If you’re worried about streaks, don’t stress…I’ve got a little hack for you. Put a little olive oil on a clean cloth and wipe your stainless-steel appliances down. You’ll be amazed at the no streak shine!
Remember, whenever you’re using cleaning products, follow the directions on the label and use them at your own discretion.
Project # 6 – Cleaning the Windows

This one is straight to the point. Spring cleaning just is not complete unless you clean the windows. The good news here is we’re only talking about the windows in the kitchen for now.

BONUS TIP
My mother swore by vinegar and water for cleaning glass. One day, I mentioned to her that it wasn’t doing a great job on the outside of my windows. She told me to add a little dishwashing liquid to the mix. Wouldn’t you know it, it worked like a charm. I’ll never forget how she said it so matter of fact as though we should all know to do that! So, no surprise, I’ve been doing it ever since. Thanks, mom.
Project # 7 – Adding Touches of Spring

We’ve now decluttered, cleaned, and organized. Now it’s time to add touches of Spring!
Let’s start with a wreath. A wreath on the front door has a way of making a great first impression. Changing out your winter wreath for a Spring one says Welcome, you’re excited about new beginnings, and come in and stay awhile.

Next, change out the dark winter pillows for some pastels or energetic pillow colors.

Ok, now it’s time to lighten up those window treatments and let the sunshine in.
You can go with white or bright curtain panels. And they can be sheer or slightly transparent, as long as they’re light.

And mind you, it doesn’t have to be curtains, it can be window shades as well. Roller shades and dual shade systems are great décor options to consider.

Another easy décor swap out could be with your artwork. Perhaps you can use the same frames and swap out the prints for your light and airy floral pieces. You could even bring out a piece from another room in the house that screams Spring with its colors and images.

BONUS TIP
You can’t add the final touches of Spring without some fresh-cut flowers around the house. With the flowers in bloom all around, you’ve got to show everyone that you’ve taken the time to stop and smell the roses (or insert your personal favorite)!
And That’s it!

Once you’ve completed these steps, you’re done! The kitchen will be officially crossed off of your list and you can relax and enjoy the space! I’d say before you jump in there to cook a dish…take a step back, breathe to take it all in, and then take a couple of snaps for your Facebook and/or Instagram page to show off your hard work! One room is now off of the list.
I hope you’ve found all of these projects and tips to be helpful. If you haven’t already checked out the video, be sure to check it out! While you’re there, hit that like and subscribe button! If you have any proven tips that your family or girlfriends use, don’t keep it a secret! Leave a comment so we can all use some hacks that will save us time and ENERGY! Can’t wait to declutter, clean, and decorate the next space with you!